kubernetes是容器世界的主要编排工具。熟悉并掌握kubernetes上的相关技能,在当前云计算领域是必不可少的。本文主要介绍一下如何在mac上安装minikube,并尝试使用helm,metallb及Istio.
virtual environment
minikube可以支持使用多种虚拟机驱动器,例如:xhyve、VirtualBox、VMwareFusion、hyperV、KVM等。在这里,我们使用virtualBox 去运行虚拟的minikube实例。
brew cask install virtual box |
使用brew安装virtualBox的过程中,有可能会遇到与kernel driver相关的错误,通过修改下面的Mac系统设置,再重新安装就能解决。
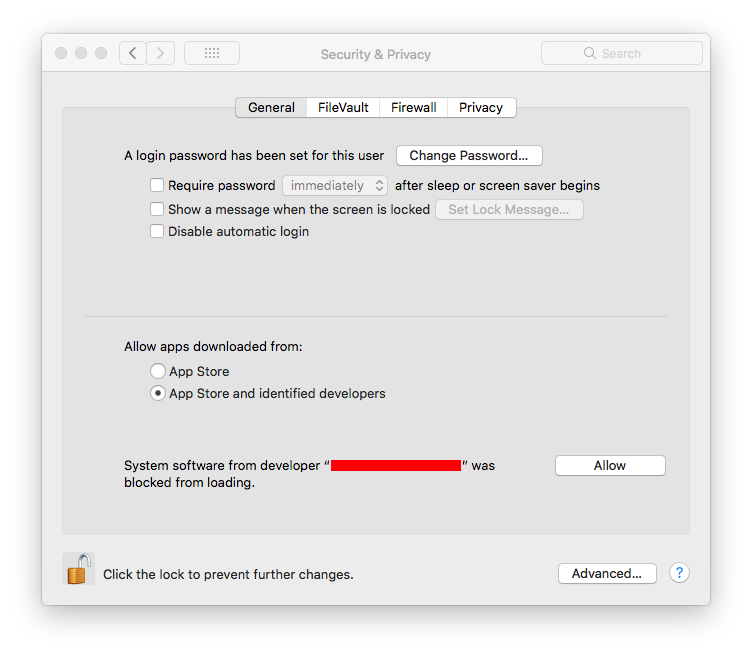
minikube
- install minikube
和上面安装virtualBox一样,在Mac上,最简单的安装方式就是使用brew去安装minikube.
# install minikube |
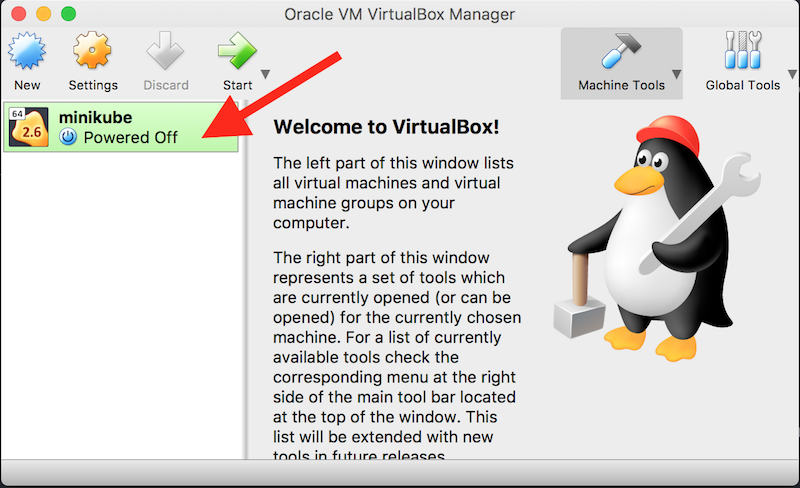
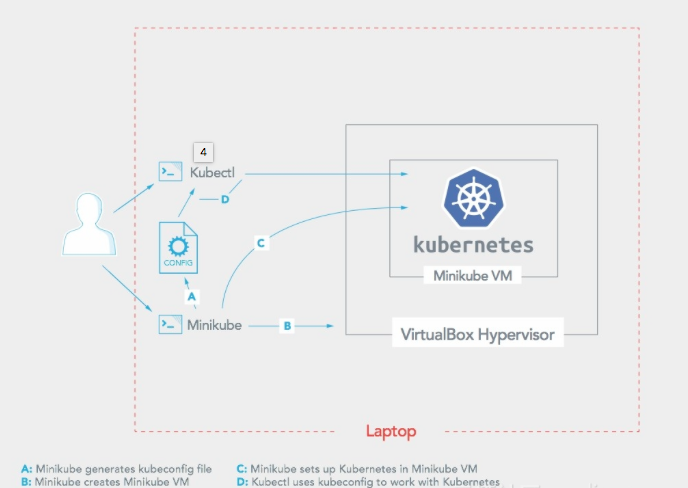
minikube is a kind of one node kubernetes cluster which is installed in one virtual machine. After installing minikube, when you open the virutalbox, you will find the “minikube” vm. At the same time, it also installs “kubectl” command at your mac laptop.
This is the architecture of minikube.
minikube will install everything on the default folder $HOME/.minikube. You can go to the folder and then dig into the details.
➜ .minikube pwd |
- minikube start
## start minikube
minikube start

## show status
➜ minikube status
minikube: Running
cluster: Running
kubectl: Correctly Configured: pointing to minikube-vm at 192.168.99.100

➜ kubectl config view
apiVersion: v1
clusters:
- cluster:
    certificate-authority: /Users/luliang/.minikube/ca.crt
    server: https://192.168.99.100:8443
  name: minikube
contexts:
- context:
    cluster: minikube
    user: minikube
  name: minikube
current-context: minikube
kind: Config
preferences: {}
users:
- name: minikube
  user:
    client-certificate: /Users/luliang/.minikube/client.crt
    client-key: /Users/luliang/.minikube/client.key
If you encountered the following error during starting minikube, you can try to fix it with the solution below.
Error Message:
Starting local Kubernetes v1.10.0 cluster...
Starting VM...
Getting VM IP address...
Moving files into cluster...
Setting up certs...
Connecting to cluster...
Setting up kubeconfig...
Starting cluster components...
E0912 17:39:12.486830 17689 start.go:305] Error restarting
cluster: restarting kube-proxy: waiting for kube-proxy to be
up for configmap update: timed out waiting for the condition
➜ ~ kubectl -n kube-system get pods
NAME READY STATUS RESTARTS AGE
coredns-c4cffd6dc-5q6n2 0/1 CrashLoopBackOff 69 5h
etcd-minikube 1/1 Running 0 4h
kube-addon-manager-minikube 1/1 Running 1 4h
kube-apiserver-minikube 1/1 Running 0 4h
kube-controller-manager-minikube 1/1 Running 0 4h
kube-scheduler-minikube 1/1 Running 1 4h
kubernetes-dashboard-6f4cfc5d87-45dr8 0/1 CrashLoopBackOff 65 5h
storage-provisioner 0/1 CrashLoopBackOff 65 5h
Solution:
2) delete the previous temp files generated.
3) if you are behind the proxy set the proxy.
4) then do the following...
$ minikube stop
$ minikube delete
$ minikube start
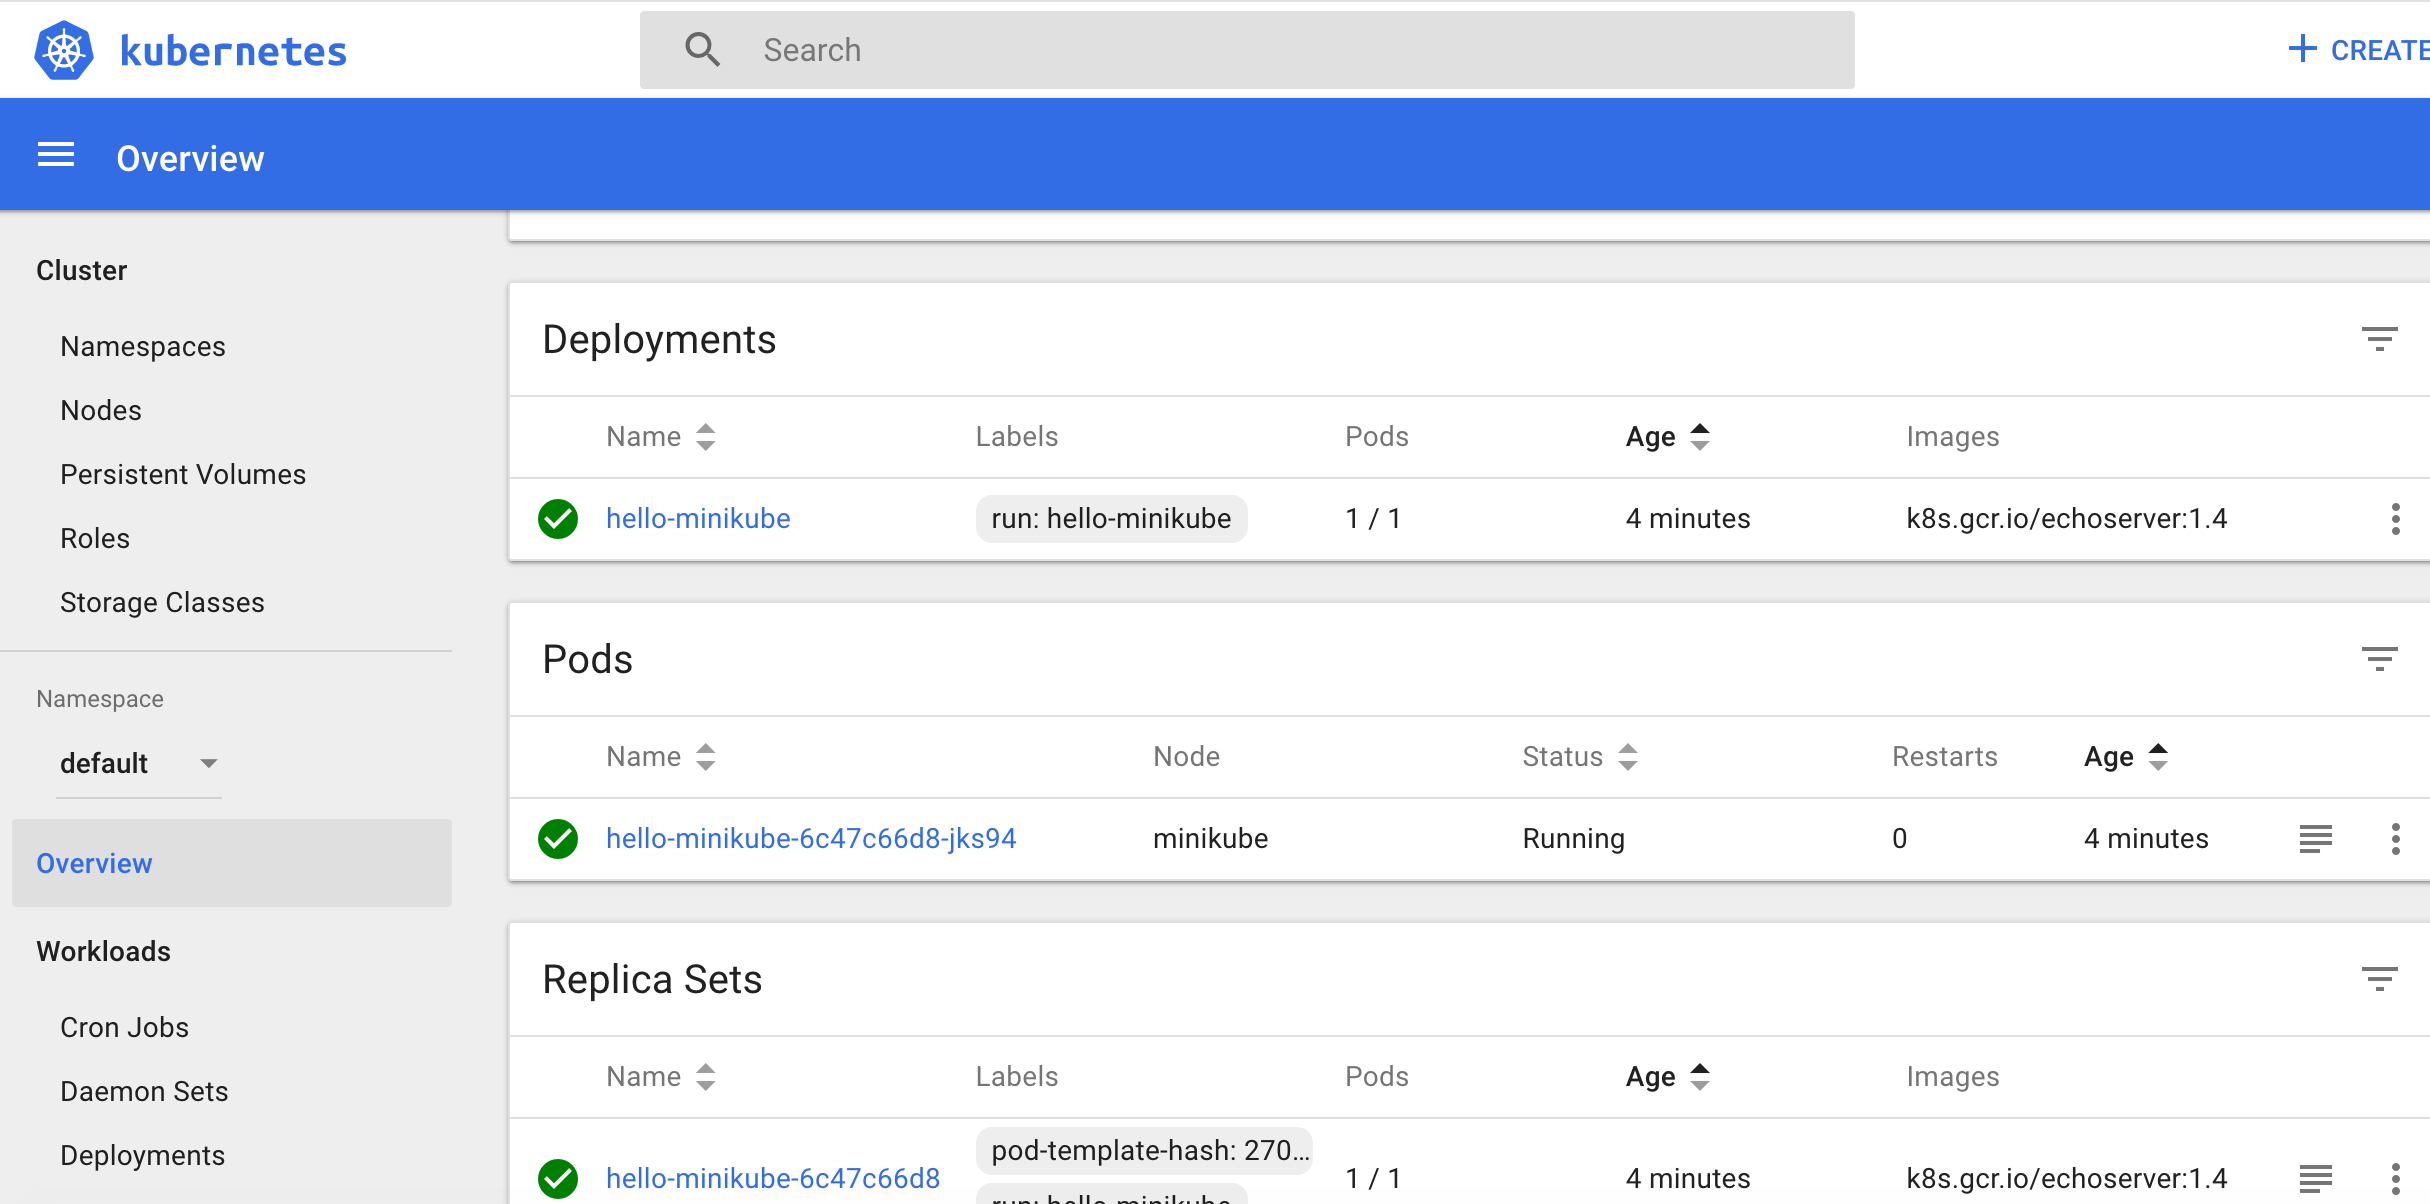
deploy hello-world in minikube
安装完minikube以后,我们可以在minikube里部署一个hello-world来验证功能。## There is no pod before deploying hello-world.
➜ ~ kubectl get pods
No resources found.
➜ ~ kubectl get ns
NAME STATUS AGE
default Active 6m
kube-public Active 6m
kube-system Active 6m
## run hello-world.
➜ ~ kubectl run hello-minikube --image=k8s.gcr.io/echoserver:1.4 --port=8080
deployment.apps/hello-minikube created
## check pod of hello-world
➜ ~ kubectl get po
NAME READY STATUS RESTARTS AGE
hello-minikube-6c47c66d8-jks94 0/1 ContainerCreating 0 6s
## expose its service as NodePort since there is no external load balancer in minikube.
➜ ~ kubectl expose deployment hello-minikube --type=NodePort
service/hello-minikube exposed
## get the details of the service.
➜ ~ kubectl get svc
NAME TYPE CLUSTER-IP EXTERNAL-IP PORT(S) AGE
hello-minikube NodePort 10.98.53.207 <none> 8080:31251/TCP 1m
kubernetes ClusterIP 10.96.0.1 <none> 443/TCP 16m
## verify it by curl
➜ ~ curl $(minikube service hello-minikube --url)
CLIENT VALUES:
client_address=172.17.0.1
command=GET
real path=/
query=nil
request_version=1.1
request_uri=http://192.168.99.100:8080/
SERVER VALUES:
server_version=nginx: 1.10.0 - lua: 10001
HEADERS RECEIVED:
accept=*/*
host=192.168.99.100:31251
user-agent=curl/7.52.1
BODY:
-no body in request-%minikube addons
minikube 里有以下的addons,可以通过 minikube addons enable 命令直接启用。➜ ~ minikube addons list
- addon-manager: enabled
- coredns: enabled
- dashboard: enabled
- default-storageclass: enabled
- efk: disabled
- freshpod: disabled
- heapster: disabled
- ingress: disabled
- kube-dns: disabled
- metrics-server: disabled
- nvidia-driver-installer: disabled
- nvidia-gpu-device-plugin: disabled
- registry: disabled
- registry-creds: disabled
- storage-provisioner: enabled
➜ ~ minikube addons enable metrics-server
metrics-server was successfully enabledstart dashboard
➜  ~ minikube dashboard
Opening http://127.0.0.1:61035/api/v1/namespaces/kube-system/services/http:kubernetes-dashboard:/proxy/ in your default browser...
- minikube ssh
we can login the vm of minikube to look into details or operate it.minikube ssh
➜ istio-1.1.0-snapshot.2 minikube ssh
_ _
_ _ ( ) ( )
___ ___ (_) ___ (_)| |/') _ _ | |_ __
/' _ ` _ `\| |/' _ `\| || , < ( ) ( )| '_`\ /'__`\
| ( ) ( ) || || ( ) || || |\`\ | (_) || |_) )( ___/
(_) (_) (_)(_)(_) (_)(_)(_) (_)`\___/'(_,__/'`\____)
$
Helm
Helm is a kind of application package manager in kubernetes platform. It can be used to list/install/update/delete application easily.
Helm consists of client “helm” and server “tiller” installed on kubernetes. The following chart is the architecture of helm.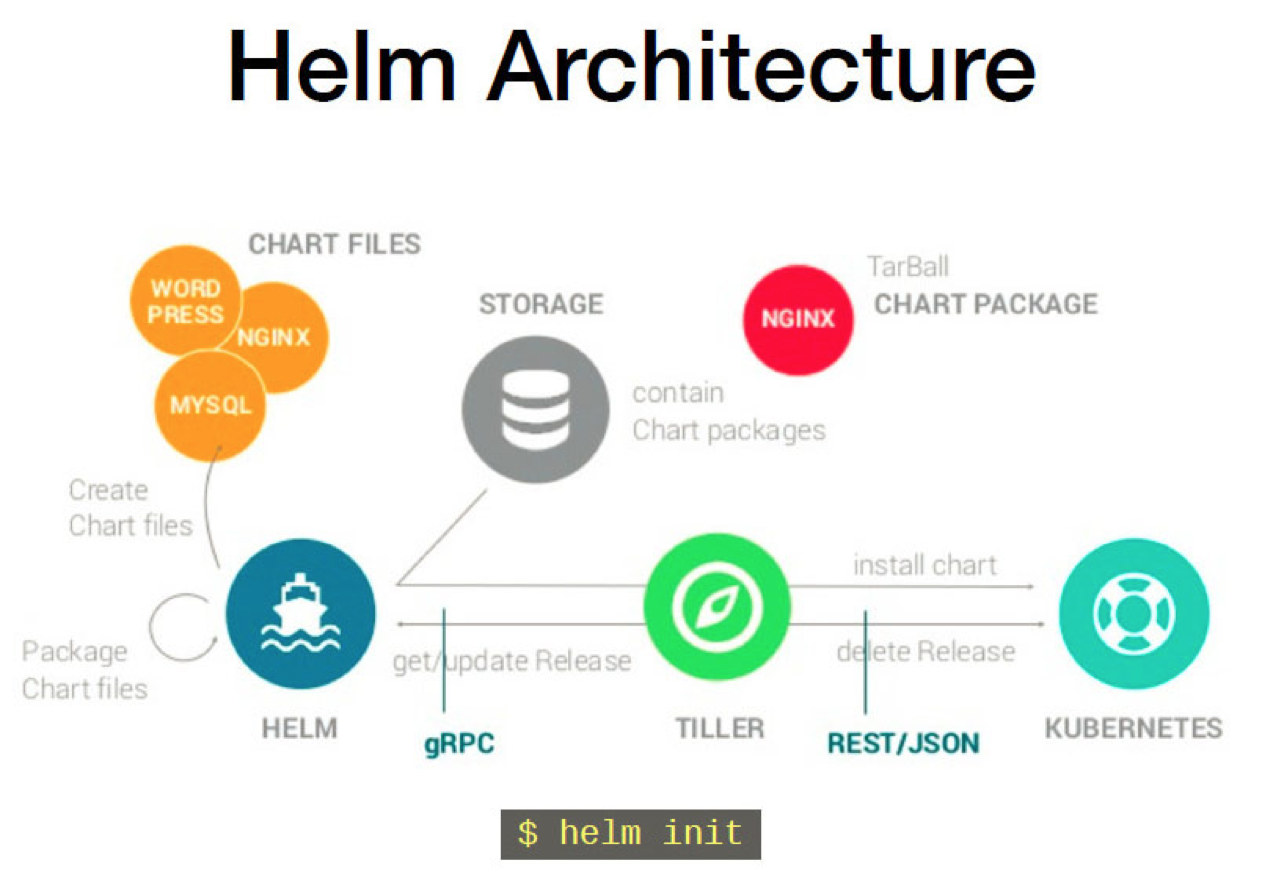
install helm
Like minikube, helm is also installed on $HOME/.helm.brew install kubernetes-helm
➜ .helm pwd
/Users/luliang/.helm
➜ .helm ls
cache plugins repository startersinitialize helm and install tiller on minikube
## check if RBAC is enable.
➜ kubectl api-versions |grep rbac
rbac.authorization.k8s.io/v1
rbac.authorization.k8s.io/v1beta1
rbac.istio.io/v1alpha1

## create user and role if The RBAC of kubernetes is enabled.

➜ kubectl apply -f install/kubernetes/helm/helm-service-account.yaml
serviceaccount/tiller created
clusterrolebinding.rbac.authorization.k8s.io/tiller created

➜ helm init --service-account tiller

## if it's disabled.
➜ helm init
Creating /Users/luliang/.helm
Creating /Users/luliang/.helm/repository
Creating /Users/luliang/.helm/repository/cache
Creating /Users/luliang/.helm/repository/local
Creating /Users/luliang/.helm/plugins
Creating /Users/luliang/.helm/starters
Creating /Users/luliang/.helm/cache/archive
Creating /Users/luliang/.helm/repository/repositories.yaml
Adding stable repo with URL: https://kubernetes-charts.storage.googleapis.com
Adding local repo with URL: http://127.0.0.1:8879/charts
$HELM_HOME has been configured at /Users/luliang/.helm.

Tiller (the Helm server-side component) has been installed into your Kubernetes Cluster.

Please note: by default, Tiller is deployed with an insecure 'allow unauthenticated users' policy.
For more information on securing your installation see: https://docs.helm.sh/using_helm/#securing-your-helm-installation
Happy Helming!

## list po to check tiller is installed into the cluster
➜ kubectl get po -n kube-system
NAME                                    READY     STATUS    RESTARTS   AGE
coredns-c4cffd6dc-cbqw9                 1/1       Running   1          1d
etcd-minikube                           1/1       Running   0          41m
kube-addon-manager-minikube             1/1       Running   1          1d
kube-apiserver-minikube                 1/1       Running   0          41m
kube-controller-manager-minikube        1/1       Running   0          41m
kube-dns-86f4d74b45-t44f6               3/3       Running   3          1d
kube-proxy-5scqj                        1/1       Running   0          40m
kube-scheduler-minikube                 1/1       Running   1          1d
kubernetes-dashboard-6f4cfc5d87-jb5rx   1/1       Running   3          1d
metrics-server-85c979995f-n5hdx         1/1       Running   2          1d
storage-provisioner                     1/1       Running   3          1d
tiller-deploy-f9b8476d-b4ws9            1/1       Running   0          2m
update the repo of helm and then install jenkins
➜ helm repo update
Hang tight while we grab the latest from your chart repositories...
...Skip local chart repository
...Successfully got an update from the "stable" chart repository
Update Complete. ⎈ Happy Helming!⎈

➜ helm search jenkins
NAME          	CHART VERSION	APP VERSION	DESCRIPTION
stable/jenkins	0.21.0       	lts        	Open source continuous integration server. It s...

➜ helm install stable/jenkins
NAME:   exegetical-manatee
LAST DEPLOYED: Tue Nov  6 20:13:58 2018
NAMESPACE: default
STATUS: DEPLOYED

RESOURCES:
==> v1/Service
NAME                              TYPE          CLUSTER-IP      EXTERNAL-IP  PORT(S)         AGE
exegetical-manatee-jenkins-agent  ClusterIP     10.100.233.152  <none>       50000/TCP       0s
exegetical-manatee-jenkins        LoadBalancer  10.99.251.83    <pending>    8080:31993/TCP  0s

==> v1/Deployment
NAME                        DESIRED  CURRENT  UP-TO-DATE  AVAILABLE  AGE
exegetical-manatee-jenkins  1        1        1           0          0s

==> v1/Pod(related)
NAME                                        READY  STATUS   RESTARTS  AGE
exegetical-manatee-jenkins-dc7bb4fff-qrkq4  0/1    Pending  0         0s

==> v1/Secret
NAME                        TYPE    DATA  AGE
exegetical-manatee-jenkins  Opaque  2     0s

==> v1/ConfigMap
NAME                              DATA  AGE
exegetical-manatee-jenkins        5     0s
exegetical-manatee-jenkins-tests  1     0s

==> v1/PersistentVolumeClaim
NAME                        STATUS  VOLUME                                    CAPACITY  ACCESS MODES  STORAGECLASS  AGE
exegetical-manatee-jenkins  Bound   pvc-70b3ad8a-e1bd-11e8-b9ce-0800277f5208  8Gi       RWO           standard      0s


NOTES:
1. Get your 'admin' user password by running:
  printf $(kubectl get secret --namespace default exegetical-manatee-jenkins -o jsonpath="{.data.jenkins-admin-password}" | base64 --decode);echo
2. Get the Jenkins URL to visit by running these commands in the same shell:
  NOTE: It may take a few minutes for the LoadBalancer IP to be available.
        You can watch the status of by running 'kubectl get svc --namespace default -w exegetical-manatee-jenkins'
  export SERVICE_IP=$(kubectl get svc --namespace default exegetical-manatee-jenkins --template "{{ range (index .status.loadBalancer.ingress 0) }}{{ . }}{{ end }}")
  echo http://$SERVICE_IP:8080/login

3. Login with the password from step 1 and the username: admin

For more information on running Jenkins on Kubernetes, visit:
https://cloud.google.com/solutions/jenkins-on-container-engine
verify the jenkins.
In order to access to the jenkins service, we have to change the jenkins services from “LoadBalancer” to “NodePort” since we don’t have an external loadbalancer yet.➜ kubectl get svc --namespace default -w exegetical-manatee-jenkins
NAME TYPE CLUSTER-IP EXTERNAL-IP PORT(S) AGE
exegetical-manatee-jenkins LoadBalancer 10.99.251.83 <pending> 8080:31993/TCP 2m
^C%
➜ kubectl edit svc exegetical-manatee-jenkins
service/exegetical-manatee-jenkins edited
➜ kubectl get svc --namespace default -w exegetical-manatee-jenkins
NAME TYPE CLUSTER-IP EXTERNAL-IP PORT(S) AGE
exegetical-manatee-jenkins NodePort 10.99.251.83 <none> 8080:31993/TCP 5m
## we also can get the service info by minikube command.
➜ minikube service list
|-------------|----------------------------------|-----------------------------|
| NAMESPACE | NAME | URL |
|-------------|----------------------------------|-----------------------------|
| default | exegetical-manatee-jenkins | http://192.168.99.100:31993 |
| default | exegetical-manatee-jenkins-agent | No node port |
| default | hello-minikube | http://192.168.99.100:31251 |
| default | kubernetes | No node port |
| default | my-nginx | http://192.168.99.100:32370 |
| kube-system | kube-dns | No node port |
| kube-system | kubernetes-dashboard | No node port |
| kube-system | metrics-server | No node port |
| kube-system | tiller-deploy | No node port |
|-------------|----------------------------------|-----------------------------|

Metallb
Metallb is a new project, open-sourced by Google end of 2017. Its goal is to manage external IPs on k8s bare-metal deployments.
After installing Metalib, there are one deployment and one daemonset in cluster.
- The metallb-system/controller deployment. This is the cluster-wide controller that handles IP address assignments.
- The metallb-system/speaker daemonset. This is the component that speaks the protocol(s) of your choice to make the services reachable.
install Metallb with helm.
## The config is not managed by helm. |
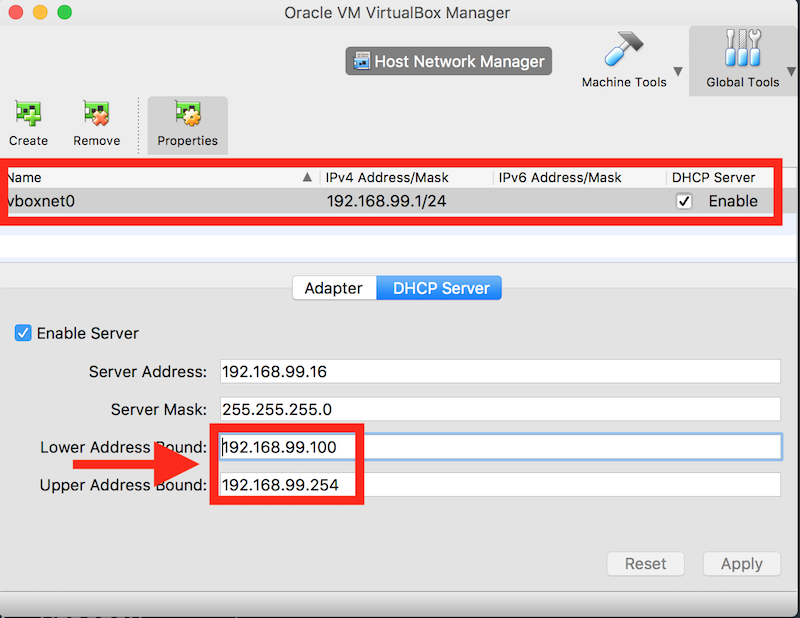
We can verify the jenkins by external ip.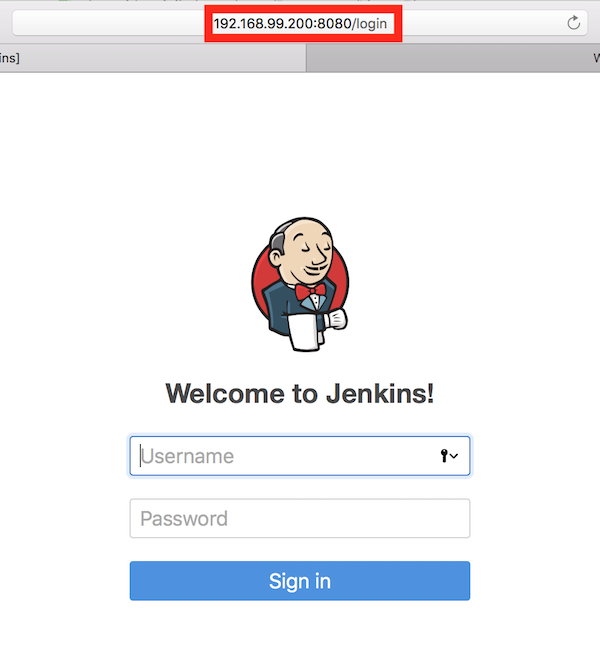
install Metallb without helm
## install Metallb without helm. ## |
Istio
Download and setup Istio
curl -L https://git.io/getLatestIstio | sh -

# or download the release and uncompress it by yourself.
wget https://github.com/istio/istio/releases/download/1.1.0-snapshot.2/istio-1.1.0-snapshot.2-osx.tar.gz

tar -xvzf istio*.tar.gz

#setup path for istio.
export PATH=/Users/luliang/Tools/istio/istio-1.1.0-snapshot.2/bin:$PATH
Install and verify Istio
Istio can be installed by kubectl or helm. Here, we will introduce how to use helm to install Istio. By the way, if the version of helm is prior to 2.10, Please create CRDs with kubectl firstly.
prerequisites
➜ kubectl apply -f install/kubernetes/helm/istio/templates/crds.yaml
customresourcedefinition.apiextensions.k8s.io/virtualservices.networking.istio.io created
customresourcedefinition.apiextensions.k8s.io/destinationrules.networking.istio.io created
customresourcedefinition.apiextensions.k8s.io/serviceentries.networking.istio.io created
customresourcedefinition.apiextensions.k8s.io/gateways.networking.istio.io created
customresourcedefinition.apiextensions.k8s.io/envoyfilters.networking.istio.io created
customresourcedefinition.apiextensions.k8s.io/clusterrbacconfigs.rbac.istio.io created
customresourcedefinition.apiextensions.k8s.io/policies.authentication.istio.io created
customresourcedefinition.apiextensions.k8s.io/meshpolicies.authentication.istio.io created
customresourcedefinition.apiextensions.k8s.io/httpapispecbindings.config.istio.io created
customresourcedefinition.apiextensions.k8s.io/httpapispecs.config.istio.io created
customresourcedefinition.apiextensions.k8s.io/quotaspecbindings.config.istio.io created
customresourcedefinition.apiextensions.k8s.io/quotaspecs.config.istio.io created
customresourcedefinition.apiextensions.k8s.io/rules.config.istio.io created
customresourcedefinition.apiextensions.k8s.io/attributemanifests.config.istio.io created
customresourcedefinition.apiextensions.k8s.io/bypasses.config.istio.io created
customresourcedefinition.apiextensions.k8s.io/circonuses.config.istio.io created
customresourcedefinition.apiextensions.k8s.io/deniers.config.istio.io created
customresourcedefinition.apiextensions.k8s.io/fluentds.config.istio.io created
customresourcedefinition.apiextensions.k8s.io/kubernetesenvs.config.istio.io created
customresourcedefinition.apiextensions.k8s.io/listcheckers.config.istio.io created
customresourcedefinition.apiextensions.k8s.io/memquotas.config.istio.io created
customresourcedefinition.apiextensions.k8s.io/noops.config.istio.io created
customresourcedefinition.apiextensions.k8s.io/opas.config.istio.io created
customresourcedefinition.apiextensions.k8s.io/prometheuses.config.istio.io created
customresourcedefinition.apiextensions.k8s.io/rbacs.config.istio.io created
customresourcedefinition.apiextensions.k8s.io/redisquotas.config.istio.io created
customresourcedefinition.apiextensions.k8s.io/servicecontrols.config.istio.io created
customresourcedefinition.apiextensions.k8s.io/signalfxs.config.istio.io created
customresourcedefinition.apiextensions.k8s.io/solarwindses.config.istio.io created
customresourcedefinition.apiextensions.k8s.io/stackdrivers.config.istio.io created
customresourcedefinition.apiextensions.k8s.io/statsds.config.istio.io created
customresourcedefinition.apiextensions.k8s.io/stdios.config.istio.io created
customresourcedefinition.apiextensions.k8s.io/apikeys.config.istio.io created
customresourcedefinition.apiextensions.k8s.io/authorizations.config.istio.io created
customresourcedefinition.apiextensions.k8s.io/checknothings.config.istio.io created
customresourcedefinition.apiextensions.k8s.io/kuberneteses.config.istio.io created
customresourcedefinition.apiextensions.k8s.io/listentries.config.istio.io created
customresourcedefinition.apiextensions.k8s.io/logentries.config.istio.io created
customresourcedefinition.apiextensions.k8s.io/edges.config.istio.io created
customresourcedefinition.apiextensions.k8s.io/metrics.config.istio.io created
customresourcedefinition.apiextensions.k8s.io/quotas.config.istio.io created
customresourcedefinition.apiextensions.k8s.io/reportnothings.config.istio.io created
customresourcedefinition.apiextensions.k8s.io/servicecontrolreports.config.istio.io created
customresourcedefinition.apiextensions.k8s.io/tracespans.config.istio.io created
customresourcedefinition.apiextensions.k8s.io/rbacconfigs.rbac.istio.io created
customresourcedefinition.apiextensions.k8s.io/serviceroles.rbac.istio.io created
customresourcedefinition.apiextensions.k8s.io/servicerolebindings.rbac.istio.io created
customresourcedefinition.apiextensions.k8s.io/adapters.config.istio.io created
customresourcedefinition.apiextensions.k8s.io/instances.config.istio.io created
customresourcedefinition.apiextensions.k8s.io/templates.config.istio.io created
customresourcedefinition.apiextensions.k8s.io/handlers.config.istio.io created

➜ kubectl apply -f install/kubernetes/helm/subcharts/certmanager/templates/crds.yaml
customresourcedefinition.apiextensions.k8s.io/clusterissuers.certmanager.k8s.io created
customresourcedefinition.apiextensions.k8s.io/issuers.certmanager.k8s.io created
customresourcedefinition.apiextensions.k8s.io/certificates.certmanager.k8s.io created
install command:
helm install install/kubernetes/helm/istio --name istio --namespace istio-system

## if we don't install metallb and there is no external loadbalancer. We have to use the following command to install istio.

helm install install/kubernetes/helm/istio --name istio --namespace istio-system --set gateways.istio-ingressgateway.type=NodePort --set gateways.istio-egressgateway.type=NodePort
issues during installation
If you encounter the following errors, you can fix it with the solution described below.
issue 1
Error Message:
Error: found in requirements.yaml, but missing in charts/ directory: sidecarInjectorWebhook, security, ingress, gateways, mixer, nodeagent, pilot, grafana, prometheus, servicegraph, tracing, galley, kiali, certmanager
Solution:
issue 2
Error Message:
Error: transport is closing
Solution:
run 'yum install -y socat' on every node can resolve this problem.
## When call helm, try to use --wait --timeout 600 and --tiller-connection-timeout 600 to fix the problem.
helm install install/kubernetes/helm/istio --name istio --namespace istio-system --wait --timeout 600 --tiller-connection-timeout 600
issue 3
Error Message:
➜ istioctl version
version.BuildInfo{Version:"1.1.0-snapshot.2", GitRevision:"bd24a62648c07e24ca655c39727aeb0e4761919a", User:"root", Host:"6408abaf1dac", GolangVersion:"go1.10.4", DockerHub:"docker.io/istio", BuildStatus:"Clean"}
## check the status of istio
➜ kubectl get po -n istio-system
NAME READY STATUS RESTARTS AGE
istio-citadel-78f695c895-bgm9c 1/1 Running 3 13h
istio-egressgateway-5dddcd6df7-f5shm 1/1 Running 3 13h
istio-galley-85fff4bf65-hd7l2 1/1 Running 3 13h
istio-ingressgateway-6d5bc988d7-gmvg2 1/1 Running 3 13h
istio-pilot-5fdf6bdb86-rgq4f 0/2 Pending 0 13h
istio-policy-59df9cf56f-vbznd 2/2 Running 19 13h
istio-security-post-install-pkrtj 0/1 Completed 0 13h
istio-sidecar-injector-5695fdf5b7-lgdbn 1/1 Running 12 13h
istio-telemetry-7d567f4998-7btv8 2/2 Running 24 13h
prometheus-7fcd5846db-8t9v2 1/1 Running 10 13h
## pilot is still pending, check it and find it's insufficient memory issue.
➜ kubectl describe po -n istio-system istio-pilot-5fdf6bdb86-rgq4f
Events:
Type Reason Age From Message
---- ------ ---- ---- -------
Warning FailedScheduling 13h (x37 over 13h) default-scheduler 0/1 nodes are available: 1 Insufficient memory.
Warning FailedScheduling 12h (x36 over 13h) default-scheduler 0/1 nodes are available: 1 Insufficient memory.
Solution:
- increase the memory of minikube to 4G by modifying the config.json
Another way is to start minikube with –memory parameter
“minikube start –memory 4096”- Edit the deployment of istio-pilot to decrease memory to 1G.

## increase the memory of minikube to 4G by modifying the config.json |
There are some addons in istio. You can install and use them directly.
prometheus
kubectl -n istio-system port-forward $(kubectl -n istio-system get pod -l app=prometheus -o jsonpath=’{.items[0].metadata.name}’) 9090:9090
http://localhost:9090grafana
kubectl -n istio-system port-forward $(kubectl -n istio-system get pod -l app=grafana -o jsonpath=’{.items[0].metadata.name}’) 3000:3000
http://localhost:3000zipkin
kubectl port-forward -n istio-system $(kubectl get pod -n istio-system -l app=zipkin -o jsonpath=’{.items[0].metadata.name}’) 9411:9411
http://localhost:9411servicegraph
kubectl -n istio-system port-forward $(kubectl -n istio-system get pod -l app=servicegraph -o jsonpath=’{.items[0].metadata.name}’) 8088:8088
http://localhost:8088/force/forcegraph.html
http://localhost:8088/dotviz
http://localhost:8088/dotgraph
- Play with istio samples.
- get ingressgetaway connection info.
export GATEWAY_URL=$(kubectl get po -l istio=ingressgateway -n istio-system -o 'jsonpath={.items[0].status.hostIP}'):$(kubectl get svc istio-ingressgateway -n istio-system -o'jsonpath={.spec.ports[0].nodePort}')

## Since we installed metallb, you also can get it with svc info.
export GATEWAY_URL=192.168.99.201:80

kubectl get svc -n istio-system
NAME                     TYPE           CLUSTER-IP       EXTERNAL-IP      PORT(S)                                                                                                      AGE
istio-citadel            ClusterIP      10.108.166.71    <none>           8060/TCP,9093/TCP                                                                                            1d
istio-egressgateway      ClusterIP      10.96.223.142    <none>           80/TCP,443/TCP                                                                                               1d
istio-galley             ClusterIP      10.102.157.176   <none>           443/TCP,9093/TCP,9901/TCP                                                                                    1d
istio-ingressgateway     LoadBalancer   10.96.187.129    192.168.99.201   80:31380/TCP,443:31390/TCP,31400:31400/TCP,15029:31130/TCP,15030:30515/TCP,15031:30093/TCP,15032:30006/TCP   1d
istio-pilot              ClusterIP      10.101.2.251     <none>           15010/TCP,15011/TCP,8080/TCP,9093/TCP                                                                        1d
istio-policy             ClusterIP      10.103.126.65    <none>           9091/TCP,15004/TCP,9093/TCP                                                                                  1d
istio-sidecar-injector   ClusterIP      10.102.18.170    <none>           443/TCP                                                                                                      1d
istio-telemetry          ClusterIP      10.103.164.99    <none>           9091/TCP,15004/TCP,9093/TCP,42422/TCP                                                                        1d
prometheus               ClusterIP      10.109.103.184   <none>           9090/TCP                                                                                                     1d
There are two ways to inject istio-proxy into your applicaton pods. The first method is that we can enable isito-injection for namespace so that all applications will be injected proxy automatically in this namespace. The second is to use istioctl manually to modify pod definition file before installing it.
enable isito-injection for namespace default
> kubectl label namespace default istio-injection=enabled
enable isito-injection by istioctl manually.
➜ kubectl apply -f <(istioctl kube-inject -f samples/bookinfo/platform/kube/bookinfo.yaml)
service/details created
deployment.extensions/details-v1 created
service/ratings created
deployment.extensions/ratings-v1 created
service/reviews created
deployment.extensions/reviews-v1 created
deployment.extensions/reviews-v2 created
deployment.extensions/reviews-v3 created
service/productpage created
deployment.extensions/productpage-v1 created

➜ kubectl get svc
NAME          TYPE        CLUSTER-IP       EXTERNAL-IP   PORT(S)    AGE
details       ClusterIP   10.96.224.7      <none>        9080/TCP   1m
kubernetes    ClusterIP   10.96.0.1        <none>        443/TCP    1d
productpage   ClusterIP   10.105.194.137   <none>        9080/TCP   1m
ratings       ClusterIP   10.105.57.93     <none>        9080/TCP   1m
reviews       ClusterIP   10.97.20.103     <none>        9080/TCP   1m

➜ kubectl get deployment
NAME                                DESIRED   CURRENT   UP-TO-DATE   AVAILABLE   AGE
details-v1                          1         0         0            0           1m
intent-wallaby-metallb-controller   1         1         1            1           1d
productpage-v1                      1         0         0            0           1m
ratings-v1                          1         0         0            0           1m
reviews-v1                          1         0         0            0           1m
reviews-v2                          1         0         0            0           1m
reviews-v3                          1         0         0            0           1m
test samples app with curl
> export GATEWAY_URL=$(kubectl get po -l istio=ingressgateway -n istio-system -o 'jsonpath={.items[0].status.hostIP}'):$(kubectl get svc istio-ingressgateway -n istio-system -o 'jsonpath={.spec.ports[0].nodePort}')

And test with curl:
> curl -o /dev/null -s -w "%{http_code}n" http://${GATEWAY_URL}/productpage
200

With browser, we can go to URL:  http://192.168.99.100:9080/productpage
- Delete istio
We can delete istio by helm if it’s installed by helm. Otherwise, you have to delete it by yourself.helm delete --purge istio
# if there are something left in kubernetes, you can delete the namespace and pod of istio-system to clean up for istio.
kubectl delete ns istio-system
kubectl delete po PODAME --force --grace-period=0
Refer to:
- https://developer.apple.com/library/archive/technotes/tn2459/_index.html
- https://github.com/kubernetes/minikube/blob/v0.30.0/README.md
- https://stackoverflow.com/questions/52300055/error-restarting-cluster-restarting-kube-proxy-waiting-for-kube-proxy-to-be-up
- https://docs.helm.sh/using_helm/
- https://preliminary.istio.io/docs/setup/kubernetes/helm-install.html
- https://www.kubernetes.org.cn/3879.html
- https://metallb.universe.tf/installation/
- https://metallb.universe.tf/tutorial/minikube/
- https://github.com/kubernetes/minikube/blob/master/docs/drivers.md